Packaging Your Beer
It is critical to follow best practices when packaging your beer to ensure the best possible finished product makes it into your glass. Using the below methods will help minimize off flavors caused by infection or oxidation.
Bottling
Bottle conditioning is one of the best ways to produce fresh and well-carbonated beer. The un-carbonated beer undergoes another fermentation in beer bottles dosed with a small amount of priming sugar. This additional fermentation creates natural carbonation with tight, little bubbles. The only major drawbacks are 1) it’s a labor-intensive process, and 2) it takes 1-3 weeks before the beers are all carbonated and ready to drink. It will also leave a small cake of yeast at the bottom of the bottle, requiring you to decant the beer into a glass or pitcher before enjoying.
Before bottling, purchase or collect enough bottles and bottle caps to bottle your beer:
5 gallons = 53 x 12oz Bottles
5 gallons = 29 x 22oz Bottles
All bottles must be able to accept a standard 26mm crown cap. 53 caps are included in all Tom’s Brew Shop extract recipe kits.
Bottling Equipment Required
- Bottling Bucket
- Bottle Capper
- Spoon
- Siphon/Drain Tubing
- Auto Siphon (unless your fermenter includes a drain valve or racking arm)
- Bottle Filling Wand
- Cleaner (PBW or 1 Step)
- Sanitizer (Star San or 1 Step)
- Towels for cleanup
Optional, but recommended
- Additional work bucket for sanitizer
- Carboy & Bottle Washer
- Sanitizer Injector
- Bottle Tree or Bottle Drying Rack
Priming sugar: how much do I use?
Just because your beer kit comes with 5oz priming sugar does not mean you need to use the entire bag. Some beer styles like Belgian Saison call for effervescent carbonation, whereas an ESB may call for low-to-moderate carbonation. While there are priming sugar calculators you can use to determine exactly how much to use, our general guidelines are as follows:
High Carbonation: 4.5-6 oz
Moderate Carbonation: 3.5-4 oz
Low Carbonation: 2.8-3.5 oz
There are a number of factors that influence carbonation, so do not be discouraged if you find the carbonation level achieved does not align exactly with our general guidelines.
While all Tom’s Brew Shop extract kits come with 5oz priming sugar, you can also use carbonation drops/carbonation tabs which are pre-measured amounts of sugar placed in individual bottles before filling. The method we’ll describe below assumes you are using priming sugar.
Bottling day step-by-step
- Set fermenter on counter or table top
- In a small saucepan, boil your priming sugar in 2 cups filtered water 10 minutes, then remove from heat and cover. Pro tip: You can prepare the priming sugar solution 24 hours in advance by boiling the sugar and water in a 16 oz mason jar via the water bath canning method.
- Place towels on floor around your work area
- Clean bottles by either soaking in PBW or 1 Step or using a Carboy & Bottle Washer. If using 1 Step, skip to Step 3
- Sanitize bottles with Star San either via dunking and soaking or using sanitizer injector
- Dry bottles upside down on either a Bottle Tree or Bottle Drying Rack, or alternatively use the tines on the racks of your dishwasher. Bottles do not have to be completely dry to proceed with bottling, just free of excess sanitizer
 Sanitize bottling bucket being sure to drain sanitizer through the spigot into another bucket
- Sanitize spoon, auto siphon, tubing, and bottling wand
- Collect a small amount of sanitizer in a measuring cup or glass and place bottle caps in sanitizer solution
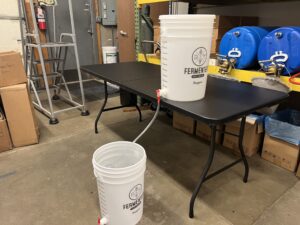
 Place your bottling bucket on the floor below the fermenter, making sure the spigot is closed
- Pour the priming sugar solution into the bucket
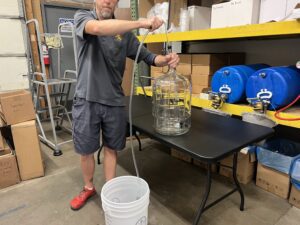
- Using either a drain valve from your fermenter or your auto siphon, rack the finished beer into the bucket, filling from the bottom up to avoid splashing
- Drain Valve: Connect tubing to the drain valve and place in bottling bucket, then open valve and drain into bottling bucket
- Auto Siphon: Set auto siphon in your fermenter with the tubing in the bottling bucket. Pump the siphon once or twice to start the flow, then hold just above the trub (sediment) to minimize the amounts of solids that flow into the bottling bucket
- Once the transfer completes, stir the contents of the bottling bucket gently, without splashing or aerating to evenly mix the priming sugar throughout the bucket
- Place the bottling bucket on the counter or table
- Attach the tubing and bottle wand to the spigot
- If necessary, rotate the spigot to the down position
- Open the spigot
- Place one bottle upright on the floor
- Insert bottling wand and press down gently, allowing beer to flow into the bottle
- When the bottle is full, remove the wand
- The nipple in the wand will stop beer from flowing when removed from the bottle – the wand evenly fills all bottles so no top-off is necessary
- Remove a bottle cap from the sanitizer solution, place it on the bottle and cap the bottle using your capper
- Repeat steps 18-21 until bottling is completed
- Clean, sanitize, and dry all equipment before storing
 Place your bottling bucket on the floor below the fermenter, making sure the spigot is closed
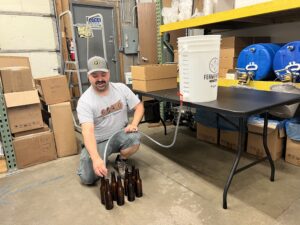 Place the bottling bucket on the counter or table
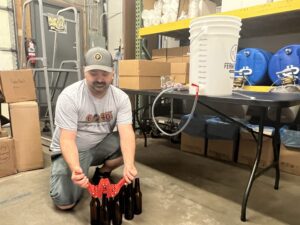 Remove a bottle cap from the sanitizer solution, place it on the bottle and cap the bottle using your capper
Place bottles in a dark place to condition. Bottles condition best at 68°F -74°F. Certain styles of beer will condition even better at warmer temperatures. Most beers will prime within one week, but it may take up to three weeks. Once bottles are primed, place in the fridge and enjoy!
Bottling tips and tricks
- If your beer aged for longer than 4 weeks in the fermenter, you may need to add some fresh yeast at bottling. We recommend using dry yeast like Lallemand CBC-1 or even Champagne yeast like Red Star Blanc. Add the fully rehydrated yeast slurry your bottling bucket between steps 12 and 13.
- If you brewed a sour beer, you may need to condition some priming yeast to the acidic environment before bottling to ensure proper carbonation. See Milk the Funk Wikipedia for more information
- If bottle conditioning is sluggish, place a box of beer on top of your clothes dryer for gentle heat and agitation
- Place bottles in the fridge for several days before drinking to firm up the yeast in the bottom of the bottle, allowing for as clear a pour as possible
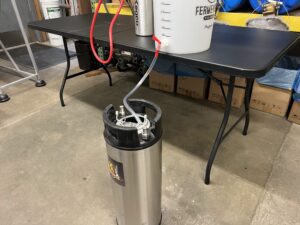
Kegging
If you are unfamiliar with your kegging system’s parts, take the time to learn each component and the basics of direct draw draught systems.
You can carbonate beer in a keg with priming sugar in the same manner as bottling, but most homebrewers opt for forced carbonation. Forced carbonation involves filling the keg, purging the head space, and then following one of three methods: Set It And Forget It, Crank And Roll, and Burst Carbonation.
All three methods start the same way:
Sanitize & Flush the Keg with CO2
- Starting with a clean 5-gallon keg, fill the keg with either:
- 3 gallons warm water and 1oz Saniclean or
- 2.5 gallons warm water and 1/2oz Star San
- Secure the lid and turn the keg upside down
- If your keg leaks slightly in this position, add 10-15 psi CO2 by connecting the gray gas disconnect to the gas in plug on the keg
- Allow to sit upside down for 5 minutes
- Turn right-side up and allow to sit for additional 5 minutes
- Hook up the keg to CO2 by connecting the gray gas disconnect to the gas in plug on the keg
- Using a black liquid disconnect, hook up a beer line to the liquid out of the keg and pour out all of the sanitizer into a bucket through your beer line. This process partially fills the keg with CO2 and flushes the liquid out dip tube, plug, disconnect, beer line and faucet with sanitizer
You now have a pressurized, sanitized keg ready for filling.
Fill the keg
- Place fermenter on counter or table top
- Clean and sanitize any racking canes, auto siphon and/or transfer tubing
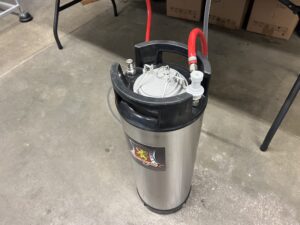
- Pull the safety ring of your keg to relieve pressure and remove the lid
- Using either a drain valve from your fermenter or your auto siphon, rack the finished beer into the keg
- Drain Valve: Connect tubing to the drain valve and place in keg, then open valve and drain into keg
- Auto Siphon: Set auto siphon in your fermenter with the tubing in the keg. Pump the siphon once or twice to start the flow, then hold just above the trub (sediment) to minimize the amounts of solids that flow into the keg
- The keg should be filled no higher than the bottom of the gas dip tube. Overfilling the keg can limit the amount of CO2 the beer absorbs
- Once filled, replace the lid
- Hook up the gas disconnect to the gas in plug and pull the lid safety ring in one second bursts 6-10 times to purge the head space of any air
 Place fermenter on counter or table top
3 forced carbonating methods
Set It And Forget It
 This is the slowest of forced carbonation methods. Following a CO2 chart, set the CO2 pressure for the keg based on kegerator temperature and desired carbonation level. Don’t forget to add 1 psi for every 2000 feet elevation above sea level. This method is highly predictable and controlled, but still takes 10-14 days.
Crank and Roll
While certainly fast, this method is highly unpredictable and can easily result in over carbonating the beer. Turn the pressure on your regular up to 30 psi-45 psi, turn the keg on its side and roll back and forth with a foot for 5-10 minutes. The agitation forces CO2 into the keg. This method is not recommended by Tom’s Brew Shop.
Burst Carbonating
This method is sped-up version of Set It and Forget It. Start by turning the pressure up to 30 psi for 24 hours, then reduce the pressure to your normal serving pressure (often 8 psi-12 psi, we use 13.5PSI), after which carbonation should peak in another 3-4 days. There is no way to tell exactly how much CO2 is dissolved in solution, but it’s a great way to start enjoying your homebrew without much waiting time.
A few tips on Burst Carbonating:
- Beer absorbs CO2 best when cold. If your beer is still at fermentation temperatures when burst carbonation is started, you may need to add anywhere from 4-12 hours to the high psi time to allow the beer to cool to refrigerator temperatures
- Volume less than 5 gallons will require less carbonating time
Here’s one of our favorite articles on keg carbonation methods:
https://brulosophy.com/2016/05/12/sparkle-fizz-methods-for-carbonation/